


Designing a saddle stitched book layout requires attention to detail and careful planning. By avoiding common layout mistakes, you can ensure a professional and error-free result. In this article, we will explore the key mistakes to avoid when creating a saddle stitched book layout and provide helpful tips to help you create a high-quality book.
Key Takeaways:
- Avoiding layout mistakes is crucial for a professional saddle stitched book.
- Careful planning and attention to detail are essential in creating a high-quality layout.
- Understanding the basics of saddle stitching and the construction process of printed pages is important.
- Optimizing page counts and avoiding pagination errors is key to a seamless reading experience.
- Choosing the right paper stock and considering margins and binding allowances are important factors.
Now we will move on to Section 2: Understanding Saddle Stitched Booklets.
Understanding Saddle Stitched Booklets
In this section, we will provide an overview of a saddle stitch booklet. We will explain the basic construction process of saddle stitching, including how the pages and cover are bound together with wire staples. Additionally, we will discuss why saddle stitching is a popular choice for print projects, highlighting its affordability, versatility, extensive range and professional appearance.
The Basic Construction Process of Saddle Stitching
Saddle stitching is a simple and cost-effective booklet binding method. The process involves folding sheets of paper in half and then stapling them along the folded edge, creating a spine. The folded sheets are nested inside each other, forming the pages of the booklet. The cover, which can be made from a heavier paper stock, is wrapped around the booklet and stitched together with the pages using wire staples.
Why Saddle Stitching Is a Popular Choice for Print Projects
Saddle stitching is a popular choice for print projects for several reasons. Firstly, it is a cost-effective option, making it suitable for both large and small print runs. The simplicity of the construction process also ensures quicker turnaround times, which can be particularly beneficial for time-sensitive projects.
Furthermore, saddle stitched booklet binding offers versatility in terms of the number of pages it can accommodate. While there is a recommended maximum printed page count, typically up to 64 pages, saddle stitching can be used for booklets with as few as 8 pages. This flexibility makes it suitable for a wide range of applications, from brochures and catalogs to event programs and newsletters.
Lastly, saddle stitching provides a clean and professional appearance. The finished booklets lie flat when open, making it easier for readers to view and access the content. This feature, along with the durability of the wire staples, ensures that saddle stitched booklets maintain their form and stay intact even with frequent handling.
Optimising Page Counts in Your Saddle Stitched Book
The Importance of Multiples of 4 in Page Layout
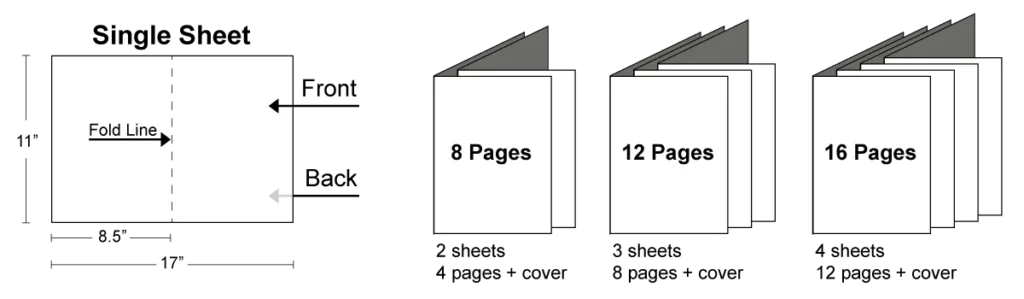
When designing a saddle stitched booklet, it is crucial to understand the importance of multiples of 4 in page layout. This is because each folded sheet forms four pages in a saddle stitched booklet. By adhering to multiples of 4, you can ensure that your book’s pages are properly aligned and that there are no blank or missing pages in your final printed product. Incorrect page counts can result in misalignment and an unprofessional appearance, so it’s essential to pay attention to this aspect of your layout.
Saying that, some clients do opt to add blank pages to make their book viable for saddle stitching (typically the inside covers)
How Page Creep Affects Layouts in High Page Counts
Page creep is a common issue that occurs in saddle stitched books with high page counts. It refers to the incremental shifting of pages as they are bound together. As the book is folded and stapled, the innermost pages are pushed slightly further towards the spine, causing the outer pages to shift outward. This can result in the content near the spine appearing too close to the binding or being partially obscured.
To mitigate the effects of page creep, it is important to make appropriate adjustments in your layout. By allowing for extra margin space near the spine, you can ensure that no critical information or design elements are lost in the binding process. By being mindful of page creep, you can maintain a consistent and well-balanced layout in your saddle stitched book, even with high page counts.
| Saddle Stitched Book Page CountsPage LayoutPage Creep Considerations | ||
|---|---|---|
| Multiples of 4 | Proper alignment, no blank or missing pages | Extra margin space near the spine to prevent content loss |
| Non-multiples of 4 | Misalignment, potential blank or missing pages | Content near the spine may be too close or partially obscured |
| High page counts | Proper adjustment for page creep | Extra margin space near the spine to prevent content loss |
Avoiding Common Pagination Errors
When designing a saddle stitched book, it’s important to be aware of common pagination errors that can occur. These errors can disrupt the flow of your book, confuse readers, and give an unprofessional impression. By understanding and avoiding these mistakes, you can ensure a seamless reading experience for your audience.
One of the most common pagination errors is incorrect page numbering. Make sure to double-check the numbering sequence of your pages to ensure they are in the correct order. This includes both the main content pages and any additional pages such as table of contents or index pages.
Another pagination mistake to watch out for is missing or duplicate pages. Missing pages can disrupt the continuity of your book, resulting in a confusing reading experience. On the other hand, duplicate pages can make your book longer than intended and create unnecessary bulk. Always review your book thoroughly to ensure all pages are present and in the correct order.
Improper placement of headers and footers is also a common pagination error. Headers and footers should be consistent throughout your book and accurately reflect the content of each page. Avoid placing headers or footers too close to the edge of the page, as they may get cut off during the binding process.
By paying attention to these common pagination errors, such as errors in page numbering, missing or duplicate pages, and improper placement of headers and footers, you can create a well-designed saddle stitched book that provides a seamless and professional reading experience for your audience.
| Error | Avoidance Tips |
|---|---|
| Incorrect page numbering | Double-check page numbering sequence to ensure correct order. |
| Missing or duplicate pages | Thoroughly review book for missing or duplicate pages. |
| Improper placement of headers and footers | Ensure consistent placement and avoid positioning too close to page edges. |
Choosing the Right Paper Stock for Saddle Stitching

In order to create a high-quality saddle stitched book, it is crucial to choose the appropriate paper stock. When selecting the paper, two important considerations to keep in mind are weight and thickness.
Weight and Thickness Considerations for Binding
The weight of the paper refers to how dense or heavy it is. Generally, a higher weight paper is more durable and can withstand the rigors of saddle stitching. For saddle stitched booklets, it is recommended to opt for a paper weight between 60 to 100 lb (90 to 150 gsm).
The thickness of the paper is another key factor to consider. Thicker paper adds stability and a premium feel to your booklet. The recommended thickness for saddle stitching is typically around 80 to 100 lb (120 to 150 gsm) for the inner pages.
Self-Cover vs. Plus Cover Booklet Options
When it comes to the cover of your saddle stitched booklet, there are two options to consider: self-cover and plus cover.
A self-cover booklet is one where the cover printed is made from the same paper stock as the inner pages. This option is suitable for booklets with fewer pages and can provide a cohesive and seamless look.
On the other hand, a plus cover booklet involves using a separate cover stock that is thicker and more robust than the inner pages. This option is ideal for booklets with higher page counts or when you want to create a more visually distinct cover.
By carefully selecting the paper weight, thickness, and deciding between a self-cover or plus cover option, you can ensure that your saddle stitched book is durable, visually appealing, and suits the specific needs of your project.
Saddle Stitched Book Design: Importance of Proper Margins and Binding Allowances
In order to create a professional and visually appealing saddle stitched book, it is crucial to understand the importance of proper margins and binding allowances. These elements play a significant role in the overall design and functionality of the booklet. In this section, we will discuss two key aspects: margin consistency throughout the booklet and adjusting the layout for binding edge and spine thickness.
Margin Consistency Throughout the Booklet
Consistency in margins is essential for a polished and cohesive saddle stitched book. It ensures a harmonious visual flow from page to page and helps maintain a professional appearance. Consistent margins also make the reading experience more comfortable for your audience. Be sure to carefully review all pages to ensure that the margins are consistent and aligned correctly.
When designing your saddle stitched book, consider the following factors to maintain margin consistency:
- Set clear guidelines for margin size and alignment
- Use gridlines and rulers in your design software to visually guide your placement of text and images
- Regularly check and adjust margins throughout the design process to ensure consistency
Adjusting Layout for Binding Edge and Spine Thickness
Binding edge and spine thickness can impact the visibility and readability of your content. It is important to account for these factors when designing your saddle stitched book to prevent any loss of important information. Here are some guidelines for adjusting the layout:
- Leave sufficient space near the binding edge to avoid important content being obscured
- Consider the thickness of the cover stock and adjust the layout accordingly to prevent any text or images from being covered by the spine
- Test your design by printing a sample copy to ensure that all content remains visible and readable after binding
| Margin | Recommended Size |
|---|---|
| Outer Margin | 0.5 inches |
| Inner Margin | 0.5 inches |
| Top Margin | 0.5 inches |
| Bottom Margin | 0.5 inches |
Table: Recommended margin sizes for saddle stitched book design
By following these guidelines, you can ensure that your saddle stitched book has consistent margins throughout and that the layout accommodates the binding edge and spine thickness without compromising the readability of your content. Paying attention to these details will result in a professional and visually stunning final product.
Utilising Covers Effectively in Saddle Stitched Booklets
In this section, we will explore the techniques and strategies to make the most out of the cover design in saddle stitched booklets. The cover serves as the first impression for readers, so it is crucial to create one that is both attractive and functional.
Designing Attractive and Functional Covers:
When designing the cover, it should grab the reader’s attention and convey relevant information about the content inside. Here are some tips to create an attractive and functional cover:
- Use eye-catching visuals and compelling imagery to engage the reader.
- Choose a visually appealing color scheme that complements the content.
- Incorporate the title and author prominently, making them easily readable.
- Consider using unique fonts or typography to create a distinct and memorable cover.
- Add any relevant design elements, such as icons or symbols, to enhance the overall visual appeal.
Text Placement and Crossover Images on Covers:
The placement of text on the cover is essential for readability and visual balance. Here are some guidelines to ensure effective text placement:
- Position the title and author name in a prominent location, such as the top or center of the cover.
- Choose fonts that are legible and match the tone of the content.
- Consider the sizing and spacing of the text to make it easily readable.
Additionally, if you plan to include crossover images on the cover, it is essential to handle them carefully. Ensure that the images align perfectly when the booklet is folded and provide a visually cohesive design. Take into account any text or design elements that may be affected by the crossover and adjust the layout accordingly.
By following these guidelines, you can create covers that not only grab attention but also effectively convey your message and entice readers to explore the contents of your saddle stitched booklet.
Setting Up Your Booklet Files Correctly
In order to ensure a smooth and successful saddle stitched printing process, it is crucial to set up your booklet files correctly. Paying attention to file formats, resolution, color modes, and other important considerations will ensure that your files are print-ready and compatible with the printing process.
File Formats: When preparing your booklet files, it is recommended to use PDF (Portable Document Format) as the file format. PDF ensures consistent file display across different devices and operating systems, and it embeds fonts and graphics, making them portable and print-ready.
Resolution: To achieve high-quality print output, it is important to set the resolution of your images and graphics to a minimum of 300 DPI (dots per inch). This ensures sharp and clear images without any pixelation or blurriness.
Color Modes: Depending on the requirements of your design, you can choose between RGB (Red, Green, Blue) and CMYK (Cyan, Magenta, Yellow, Black) color modes. RGB is suitable for designs intended for web or screen display, while CMYK is the standard color mode for print. It is important to convert your design to CMYK color mode to ensure accurate color representation in the final printed booklet.
Bleed and Trim: To avoid white borders or unwanted gaps around the edges of your pages, it is essential to include a bleed area in your booklet files. A bleed area extends beyond the trim size of your booklet, typically by 3mm to 5mm, ensuring that there is no blank space after trimming. Additionally, ensure that all important content is within the safe area of the page, avoiding the risk of it being trimmed off.
Fonts and Images: When setting up your booklet files, it is important to embed the fonts used in your design to ensure consistent display and printing. If you are including images in your booklet, make sure they are high-resolution and saved properly within the file, whether embedded or linked externally.
By following these guidelines and best practices for setting up your booklet files, you can ensure that the printing process goes smoothly and that your saddle stitched book turns out exactly as you envisioned.
Assessing Binding Options for Landscape Oriented Booklets
When it comes to binding landscape oriented booklets, there are several considerations and limitations to keep in mind. While saddle stitch binding is a popular option for many projects, it may present challenges when working with landscape layouts. In this section, we will explore these limitations and provide tips to help you create professional saddle stitched landscape booklets.
Limitations and Considerations for Saddle Stitch Binding
One of the primary limitations of saddle stitch binding for landscape booklets is the orientation of the binding itself. Traditional saddle stitching involves folding the pages in half and stapling them along the fold. This works well for portrait-oriented booklets, but can present difficulties when binding landscape-oriented layouts.
Here are a few key limitations to be aware of:
- The width of the spine may be limited: Saddle stitching typically requires a minimum width for the spine where the pages are folded and stapled together. For landscape booklets, this may limit the number of pages you can include without compromising the binding’s integrity.
- Page orientation: Depending on your layout, you may need to consider the orientation of your pages to ensure that they are properly aligned and readable after binding.
Despite these limitations, saddle stitch binding can still be a viable option for landscape booklets with careful planning and execution. Here are some tips to help you achieve the best results:
Tips for Landscape Booklets in Saddle Stitched Formats
- Consider the number of pages: Due to the limited width of the spine, it is important to carefully plan the number of pages in your booklet. Keep in mind that a larger number of pages may compromise the appearance and functionality of the saddle stitched binding.
- Optimize page layout: Pay special attention to your page layout to ensure readability and proper alignment after binding. This may involve adjusting the content and design elements to match the landscape orientation.
- Use larger staples: If your booklet has a higher page count or thicker paper, consider using larger staples for added durability and strength.
- Consider alternative binding options: If the limitations of saddle stitch binding pose significant challenges for your landscape booklet, you may want to explore alternative binding options such as perfect binding or wire-o binding.
By taking these tips into consideration, you can overcome the limitations of saddle stitch binding and create professional landscape booklets that meet your design and functionality requirements.
| Saddle Stitch BindingPerfect BindingWire-O Binding | |||
|---|---|---|---|
| Binding Method | Pages are folded in half and stapled along the fold | Pages are glued together along the spine | Pages are bound using a metal wire spiral |
| Page Count Limitation | Limited by the width of the spine | Generally suitable for higher page counts | Suitable for a wide range of page counts |
| Orientation Flexibility | Limited by the orientation of the fold | Allows for various orientations, including landscape | Allows for various orientations, including landscape |
| Appearance | Crisp and professional | Clean and seamless | Modern and functional |
Meeting the Challenges of Crossover Images in Saddle Stitched Layouts
Incorporating crossover images in saddle stitched layouts can present several challenges that designers need to address. One of the key considerations is ensuring proper registration and alignment between the two opposing pages of the crossover image. This ensures that the image appears seamless and visually cohesive, enhancing the overall design of the saddle stitched booklet.
To ensure registration and alignment, designers should carefully position the crossover image on the layout, taking into account the fold and placement of the staples. It’s important to avoid any visible gaps or misalignment between the pages to maintain a professional and polished appearance.
The center spread, where the two opposing pages of the crossover image are printed on the same sheet, can also pose challenges. Designers need to handle the center spread with care to maintain a seamless visual flow and avoid any distortion or discontinuity in the image. This may involve adjusting the placement of the image or making subtle modifications to maintain alignment and balance.
When working with crossover images, it can be helpful to consider the following design tips:
- Ensure that the crossover image is high resolution and properly formatted for printing.
- Take measurements and create guides to ensure accurate registration and alignment.
- Use professional design software that offers precise control over the positioning and placement of elements.
- Pay careful attention to the bleed area to avoid any white borders or gaps in the crossover image.
- Proofread the design multiple times to check for any alignment or registration errors before sending it for printing.
By following these design tips and addressing the challenges associated with crossover images, designers can create saddle stitched layouts that are visually stunning and professionally executed.
Preparing Artwork for Efficient and Accurate Saddle Stitch Binding
In order to ensure a smooth and seamless saddle stitch binding process, it is crucial to properly prepare your artwork. By following the right guidelines and avoiding common mistakes, you can achieve efficient and accurate results. In this section, we will discuss two important aspects of preparing artwork for saddle stitch binding: avoiding the submission of artwork as spreads and opting for optimal layout formats for printing and binding.
Avoiding the Submission of Artwork as ‘Spreads’
When submitting your artwork for saddle stitch binding, it is essential to avoid submitting it as spreads. Artwork spreads are typically two facing pages displayed as a single image, which can cause confusion during the printing and binding process. Instead, separate your artwork into individual page files that represent the correct sequencing of the pages in your saddle stitched book. This will help the printer accurately reproduce your intended layout and ensure that pages are properly aligned and stapled together.
Optimal Layout Formats for Printing and Binding
Choosing the right layout format for your saddle stitched book is crucial for smooth printing and binding. The most commonly used layout format is the single-page format, where each page is designed individually as a separate file. This format ensures that pages are printed and bound accurately, as there is no ambiguity in the sequencing or placement of pages.
If you are working with software that supports the creation of spreads, it is still recommended to design each page individually and then create a separate spread layout for final preview purposes only. This allows you to maintain control over the individual pages and ensures that they are correctly positioned for saddle stitch binding.
By following these guidelines and using the optimal layout formats, you can streamline the saddle stitch binding process and achieve efficient and accurate results. Properly prepared artwork will help ensure that your saddle stitched book looks professional and meets the highest standards of quality.
Mistakes to Avoid with Binding Edge and Spine Areas
In saddle stitched book design, it is crucial to pay attention to the binding edge and spine areas to ensure a well-executed and readable final product. By avoiding common mistakes in these areas, you can enhance the overall quality and professionalism of your saddle stitched books.
Importance of Content Clearance Near the Binding Edge
One of the key mistakes to avoid is insufficient content clearance near the binding edge. It is essential to leave enough space between the edge of your content and the binding area to prevent important information from being obscured or cut off during the binding process. Lack of adequate content clearance can lead to frustrations for readers and compromise the readability of your book.
When designing your saddle stitched book, consider the thickness of the binding and allow for a reasonable margin of clearance between your content and the binding area. This will ensure that your text, images, and other elements remain intact and visible, providing an optimal reading experience.
Understanding the Limitations of Spine Area in Saddle Stitched Books
Another critical aspect to consider is the limitations of the spine area in saddle stitched books. Due to the nature of saddle stitching, the pages are folded and then bound together, resulting in a narrower area along the spine. This limitation can affect the visibility and legibility of content placed in this area.
It is important to design your layout with the spine limitations in mind. Avoid placing vital information, such as titles or crucial parts of images, directly on the spine area, as they may be partially or entirely obscured when the book is bound. Instead, adjust your layout to ensure that important elements are positioned away from the spine and still easily visible to the reader.
By understanding the limitations of the spine area and taking precautions in your design, you can create a visually appealing and reader-friendly saddle stitched book.
| Mistakes to Avoid with Binding Edge and Spine Areas |
|---|
| 1. Insufficient content clearance near the binding edge: |
| Ensure adequate space between the edge of your content and the binding area to avoid obscuring or cutting off important information. |
| 2. Placing vital information on the spine area: |
| Avoid positioning crucial elements, such as titles or essential parts of images, directly on the narrow spine area to ensure their visibility in the bound book. |
Conclusion
In conclusion, designing a saddle stitched book requires careful attention to detail and a thorough understanding of common layout mistakes to avoid. By following best practices and implementing the tips provided in this article, you can ensure that your saddle stitched book layout is professional and error-free.
Remember the importance of optimising page counts by designing layouts that are multiples of 4, and be aware of the potential effects of page creep in high page count books. Additionally, avoid common pagination errors such as incorrect page numbering and missing or duplicate pages to maintain a seamless reading experience.
Choosing the right paper stock is crucial for achieving the desired durability and aesthetic appeal. Consider the weight and thickness of the paper, as well as the option of self-cover or plus cover booklets. Proper margins and binding allowances are essential for a professional look, so ensure consistency throughout the booklet and adjust layouts to accommodate the binding edge and spine thickness.
Lastly, make effective use of covers to create attractive and functional designs, paying attention to text placement and handling crossover images. By adhering to these guidelines and avoiding the identified mistakes, you can create a high-quality saddle stitched book that captivates readers and leaves a lasting impression.
FAQ
What are the most common layout mistakes to avoid when designing a saddle stitched book?
Some common layout mistakes to avoid include improper page counts, incorrect pagination, issues with margins and binding allowances, and poor cover design. It is important to carefully plan and pay attention to detail to create a professional and error-free saddle stitched book layout.
What is the construction process of saddle stitching for booklets?
Saddle stitching involves binding the pages and cover together with wire staples. The folded sheets are nested inside one another and then stapled along the fold line to create a booklet. This method provides durability and a professional appearance to printed materials.
Why is saddle stitching a popular choice for print projects?
Saddle stitching is a popular choice due to its affordability, versatility, and professional appearance. It is suitable for a wide range of print projects, including promotional and sales catalogues, exhibition catalogues, periodical magazines, event booklets, research material, and school diaries.
How can I optimize the page counts in my saddle stitched book?
It is important to design page layouts that are multiples of 4, as each folded sheet forms 4 pages in a saddle stitched booklet. This ensures proper alignment and eliminates blank pages. Additionally, you should be aware of page creep, which can affect layouts in high page count books, and consider adjusting for this issue.
What are some common pagination errors to avoid in saddle stitched book design?
Common pagination errors include incorrect page numbering, missing or duplicate pages, and improper placement of headers and footers. It is important to carefully review and proofread your design to ensure a seamless and error-free reading experience for your audience.
How do I choose the right paper stock for my saddle stitched book?
When choosing paper stock, consider the weight and thickness requirements for binding. Also, decide between self-cover booklets, where the cover is made from the same paper as the pages, or plus cover booklets, where a separate cover stock is used. These choices will depend on the number of pages and desired durability for your project.
What is the importance of proper margins and binding allowances in saddle stitched book design?
Proper margins ensure a professional look and consistent spacing throughout the booklet. It is important to adjust the layout to accommodate the binding edge and spine thickness, ensuring that no content is lost during binding. Paying attention to these details will result in a well-designed and readable saddle stitched book.
How can I effectively utilize covers in my saddle stitched booklets?
Covers play a crucial role in attracting the reader’s attention and conveying information. Design covers that are both attractive and functional, ensuring they grab the reader’s attention while providing relevant information. Consider text placement and handle crossover images on covers to create visually appealing and cohesive designs.
How do I set up my booklet files correctly for saddle stitched printing?
To set up your booklet files correctly, ensure they are in the appropriate file format, have the correct resolution and color mode, and follow other important guidelines. This will ensure your files are print-ready and compatible with the saddle stitched printing process.
What are the challenges and considerations when binding landscape oriented booklets with saddle stitch?
There are limitations to saddle stitch binding for landscape booklets. Overcoming these challenges requires careful planning and consideration of layout and orientation. By following practical tips, you can successfully bind landscape oriented booklets using saddle stitch and achieve a professional result.
How can I incorporate crossover images into my saddle stitched layouts?
Incorporating crossover images requires ensuring registration and alignment between the two opposing pages. It is important to carefully handle the center spread, where the two opposing pages are printed on the same sheet, to maintain a seamless visual flow. Proper planning and design considerations will result in effective use of crossover images.
What artwork preparation guidelines should I follow for saddle stitch binding?
Avoid submitting artwork as spreads and follow recommendations for layout formats that are compatible with the printing and binding processes. By following these guidelines, you can ensure efficient and accurate saddle stitch binding for your artwork.
What mistakes should I avoid with the binding edge and spine areas of my saddle stitched book?
Mistakes to avoid with the binding edge and spine areas include not providing adequate content clearance near the binding edge and not understanding the limitations of the spine area. It is important to allow enough space for important information and text to be visible and to ensure a well-designed and readable saddle stitched book.